Monday, May 25, 2015
Sunday, May 17, 2015
3 Panel Chicken Wire Screen Project DIY
We wanted to share how to build a 3 Panel Chicken Wire screen, for displays or backgrounds.
Above is the finished product, so let's start from the beginning.
Each panel is 25 1/2" wide x 72" tall, so when folded into itself that is the width and height.
List of tools used
Miter Saw
Table Saw
Drill
Screw Gun
Countersink drill bit
Wire Cutters/ Tin Snip
Staple Gun
Tack Hammer
Materials used
1 x 4 old barn boards ( new pine will work just as well, but will not have chippy colors )* if you don't have a table saw get 1 x 2 boards instead of ripping down 1 x 4's***
Wood Glue
Screws 1 5/8"
Staples 3/8"
Hinges
Chicken Wire 24" wide x 25' roll
Okay lets get started.
Take the 1 x 4 boards and rip them on the table saw to 1 3/4" wide to make the sides of the panels and the diagonal braces. Below shows all the parts cut.
6 pcs 1" x 1 3/4" x 72" sides
9 pcs 1" x 4" x 22 1/2" cross members
24 pcs 1" x 1 3/4" x 5" (?) diagonal braces 45° cuts * because there are so many of these I did not measure the length exactly, I just line them up with the edge of the fence of the miter saw (see below)
The next step is to drill all the holes for the screws, with the countersink drill bit set to a depth that is just a bit shorter than the wood width.
Now we are ready to start putting it all together. I used the jig pictured above, which is just 3 pieces of plywood attached to two 2 x 4's. The plywood is spaced to match where the cross pieces will land.
I started at the top and screw the 2 sides to the top cross piece. and then the bottom cross piece and that is about 6" from the bottom. The middle cross piece is centered. I always glue the joints before screwing to add strength and stability.
Adding the diagonal bracing, this is what really adds the torsional strength and makes everything tighten up. I did not measure out the location for each one, just put them where the fit right and screw down.
Okay, so framing built. Next Step.
This part we do on the floor inside (A/C). Roll out a little of the chicken wire and staple to the back side of the first panel, starting at the bottom cross member. Be sure to stretch out the wire before stapling it down in the different areas. We also used the the tack hammer to pound down the staples that were sticking up.
The last step is to add the hinges to the panels. We used 3 hinges per side, and you will need to verify which edge, and side to add the hinges to make sure that the finished screen all panels are facing the right direction.
If there is anything that I left out, or if I was not clear on anything, and you have any questions. Please feel free to ask.
Here are some pictures of other ones that we built. The first 2 are for local photographers and they use them for backgrounds for senior pictures, by hanging school spirit items on them. The last one is the same screen as above in our space ready to sell.
check out the labels listed below to see other creations
Monday, May 4, 2015
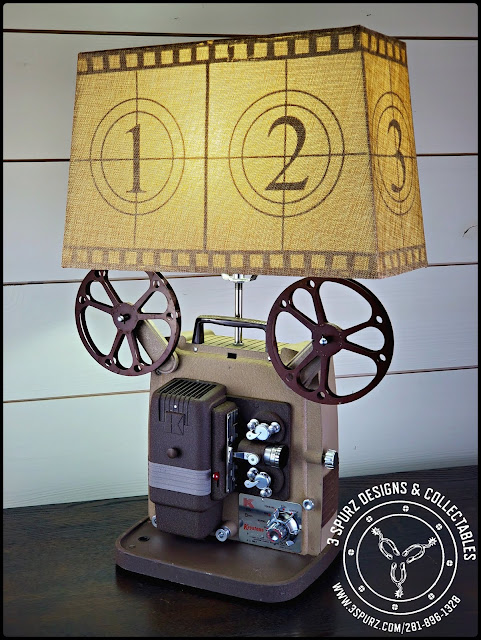
Bell & Howell 8 mm projector lamp
Vintage Bell & Howell projector lamp with custom lamp shade.
check out the labels listed below to see other creations
Movie Projector Lamp
Vintage Coffee Pot Lamp
Sunday, May 3, 2015
Kitchen Island or Coffee Bar ?
This is one of those awesome times when you get to see your creation connect with a customer.
Well it might be better to let them do the talking. Here is a text that we got this morning from a great couple that recently purchased one of our pieces a few weeks ago.
Here is a photo of our Kitchen Island transformed to a Coffee Bar. We have been so happy with your design that we are now remodeling our kitchen to match the Coffee bar. I have posted this on my Facebook page and have had a great response to your work. Thanks again and looking forward to seeing more creative offerings from 3 Spurz.
Jeff & Debby
This is the before and after picture of the kitchen island
Jeff & Debby feel in love with the island, but they were looking for a coffee bar and the overhang in the back would not allow it to fit in the space that they had planed for the coffee bar.So to fix the issue we had Ken @ D&S Antiques remove the top on cut off the overhang so it would fit and now they are using that piece as a back splash for the coffee bar. I love it when everything works.
We look forward to being able to show more of our creations in their new homes in the future.
check out the labels listed below to see other creations
Subscribe to:
Comments (Atom)


